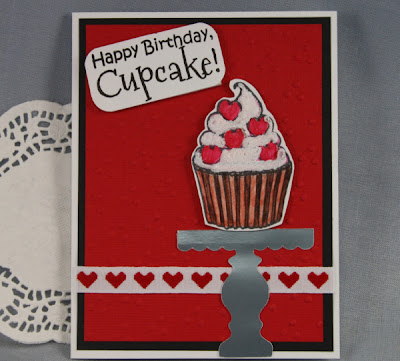
Yeah that's right it's my turn to teach you all a new technique
for Tutorial Time on Speedy TV
Just a bit of a story before I get started...
This is not my original idea...I had this wonderful
Stampin' Up demonstrator that did this class
called Tool's and Techniques.
This is where I learned so much...it was a blast...
thanks Bernice for teaching cool tricks....
well now for the tutorial that I learned from her...
Faux Frosting Technique
Tools & Supply List:
·
Dazzling Diamonds glitter or any ultra-fine
sparkly glitter
·
White or clear embossing powder
·
Small container for mixture
·
Multipurpose adhesive glue
·
Heat gun/heat tool
·
Ink pad of choice
·
Stamp of choice
·
Markers for coloring
1-
Mix equal amount of Glitter (any ultra-fine
sparkly glitter will work) with the White or Clear embossing powder, it will
not take much so if you only plan a few of these then just do a small mount.
Mix in a small container and set aside.
Tip~ if you want the color of your
image to show then you will want to use clear embossing powder. I used white
for this tutorial.
2-
Stamp your image of choice. Color it to your
liking.
3-
Now that the stamp is ready to go, add adhesive
glue to the area in which you want to have
the faux frosting look…
4-
Sprinkle powder mixture, glitter and embossing
powder, over the adhesive. Tap off any excess of the mixture.
5-
Apply heat with the heat tool or heat gun until
the ‘frosting’ starts to bubble. Let cool then repeat heating until it starts
to bubble. Let cool. Repeat this until the adhesive glue is dry.
Tip~ when using the heat tool you can heat from behind or
underneath, this way you are less likely to burn your image. Be sure to take
your time. This can take a few rounds of heating and cooling to get it to dry
completely.
Now add a sentiment and add it to a card…whah la you are
done…
There you have it Faux Frosting Technique…easy peasy….and
fun too…
The stamp set I used for this tutorial will be shown NEXT week during
the Sneak Peak blog hop by the Senior Design Team members...
so be sure to check that out too...
Ok so it was a long tutorial, but worth it huh...
Now you try it and link your project to MFPSpeedyTV the
Tutorial Time Challenge group...
Look for Challenge # 35
you could win
this Cracked Hello Stamp Set.
Be sure to check out the other design team members for some inspiration on how they used this technique...


Girl, you are amazing! What an easy tutorial and the cupcake turned out so cute!
ReplyDeleteHi Katie,
ReplyDeleteMy first try turned out horribly - I put too much of the mixture on my first cupcake and it ended up looking like an explosion - covering 1/2 the cupcake. Well, Ilearned my lesson and only did part of the cupcake's icing and it turned out perfect. Fun tutorial - thanks for sharing. Your card is adorable - and really looks yummy!
Love your card Katie and the technique was so fun. Thanks for sharing it with us, I was a little hesitant but your steps made it quite easy!
ReplyDeleteGreat tutorial! This is definitely fun! Love your card!
ReplyDelete